Up close and Personal – MACRO Photography Tips

This post is also published on PictureCorrect.com. You can find it here.

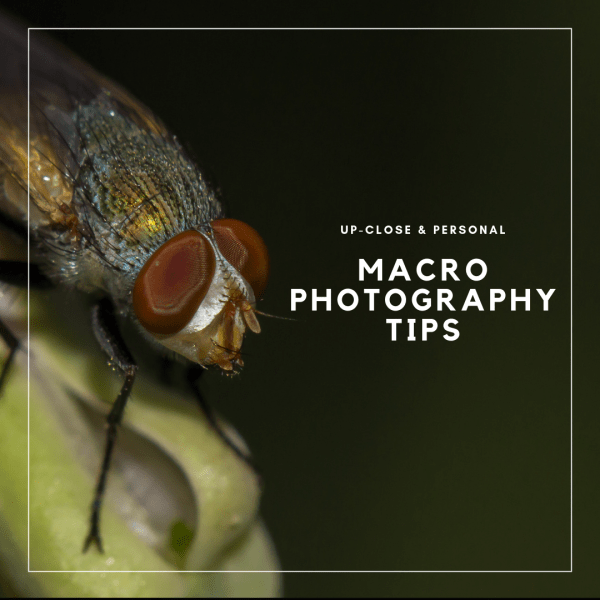
Whether you accept it or not, we all love MACRO photographs. I mean, who doesn’t like an intensely detailed bug or a flower on a silky creamy background? The first thing that we do after getting our hands on DSLR for the first time is to go to our backyard and start taking flower pictures. But in reality , MACRO photography is much more difficult as it seems to be. I do normally landscape and street photography but recently I decided to give a try to MACRO and found it to be much more challenging technically as compared to any other type of photography.

I just started it, so I am not an authority on it. But I just learned some stuff about it so I decided to write a blog post on it to keep everything in order so that I can start improving on top of it.

Like every picture, a macro has its aesthetic as well as technical aspects so first start with its aesthetic qualities because it’s easier to learn and it doesn’t require any extra gear/add-on.

Aesthetic Qualities

1. Simplicity IMG_8718

The Allium by Imran Zahid

Macro is all about one and only subject. Unlike landscape or street or any other type of photography, it doesn’t and shouldn’t have any layers or multiple points of interests. The image should be damn flat with all the attention leading towards the subject with minimum connection with background. When I am saying minimum connection I mean aesthetically background should not grab attention of viewers. It should be very simple. We can achieve this by either blurring it or using high contrast compositions which is what we call figure to ground relationship.

2. Details

IMG_8746
Apple by Imran Zahid

The ultimate goal of a macro shot is to show the unique and fantasy world that normally we cannot see with our naked eye. So choose your subjects wisely. Don’t select subjects that we used to observe normally in detail. Choose subjects and their angles that we are unaware of. Try to show the absolute level of detail that even if we look closely with our naked eye , we can’t. That’s where the MACRO photos actually shine. That’s why a lot of people are going towards insects and bugs as we don’t normally observe them so closely. As the saying goes , the devil is in the details. So , get extremely close to your subject and try to bring a completely new world to your viewers.

3. Composition

IMG_9240
The Fly by Imran Zahid

Just because there are minimal components in MACRO photograph, doesn’t make it less worthy for putting effort in composition. In fact, composition is extremely vital for the success of macro photos. Composition rules like golden ratio, rule of thirds, diagonals and leading lines were never so important before MACRO photography. It’s very important to create dynamic and fluent compositions or else chances are that even with immense amount of captured details, the photograph will still fall flat on its face. So utilize all those composition rules on macro to make it more interesting and eye catchy.

With all its simplicity, MACRO photography is not at all simple when it comes to technical aspects. Below are some of the technicalities you need to keep in mind while doing MACRO.

Technical Challenges and their solution

1. Limited Depth of Field

IMG_8447-3
Housefly by Imran Zahid

Normally when we do portraits or stock or street photography, we are doing everything in our power to create creamy bokeh and shallow depth of field. But when it comes to MACRO it’s the other way around. We are doing everything to get a few extra millimeters in focus so that we can capture details properly. Because we are focusing very closely (normally only a few inches) , depth of field is literally in millimeters. Now you can do a couple of things . You can go back a little , loose some details but get more focus or increase aperture. Both approaches have their own pros and cons. You can only increase aperture to a limit where diffraction don’t happen otherwise entire picture will be soft. Even if you increase aperture within limits, since it changes exposure, you need to either slow down shutter speed or increase ISO.YES, welcome to Hell of MACRO world. So it’s a whole trial and error procedure to see what’s acceptable for you in given condition.

2. Exposure / Lack of light

IMG_8667-4
The Bee by Imran Zahid

As mentioned above , you need to increase your aperture to your maximum limit if you want your tiny subject to be completely in focus. But with this approach , your exposure will be down by miles. Now in order to get proper exposure , you can do a few things.

  1. You can decrease shutter speed if possible (stationary subject)
  2. Increase ISO to acceptable limits
  3. Use some sort of flash

Best solution is a combination of all. Now a day camera ISO performance is pretty good , so you can go with this option safely. Flash with some modifiers are also cheap. Even popup flashes will work. I do all MACRO work with popup flash. It can produce decent results. Shutter speed cannot be changed in most of the situations but whenever its possible go for it too.

3. Noise Reduction

IMG_8544-3
Daisy Flower by Imran Zahid

Even after all these remedies, still you picture will have a lot of noise especially if you are using crop censor bodies like me. And since MACRO pictures are normally simple in composition with very plan/creamy backgrounds , the noise is very much visible. So, you might not came across this noise issue until now in other types of photography but you need to seriously know how to reduce noise in you photos now. Noise reduction and sharpening go side by side and I can point you to some of very good tutorials on it that really helped me overcome this.

How to do Noise Reduction in Lightroom

How to Properly Sharpen Images in Lightroom

The whole point of this section is not to De-motivate you but to actually prepare you to handle all these issues. They are not as big as it seems. But if you really like your photographs to be what you saw on internet , you need to work around these issues.

Conclusion

Macro photography is really fun. Even on those days where you feel dull and you don’t want to go outside for landscapes, street or any other type of photography. You can do macro in your backyard or even in your room. Its really fun. Its demanding but at the same time very rewarding as well. If budget is not your problem you can certainly go for following gear to help you in your tasks.

  1. Ring flashes for beautiful even lighting or even separate TTL flash for controlled lighting.
  2. Full frame body for better ISO performance.
  3. A good tripod with cable release for stationary subjects.
  4. Flash modifiers and backgrounds for creating some mood in your photos.

Even if you are on a budget, don’t let this hamper your spirit. You can do everything without all fancy gear. You just need to be patient and know have to how to work around these issues. The WORD here is persistence. Stick to your goal and you will eventually able to do it. You don’t even need a dedicated MACRO lens for it. If you are on a budget You can go on following route

  1. Instead of dedicated MACRO lens, go for reverse ring or extension tubes. A little difficult but much less costly than lenses.
  2. Instead of ring flashes , purchase popup flash modifiers. Very cheap in market.
  3. Learn thoroughly how to reduce noise and increase sharpness in light room/Photoshop.

That’s it. Happy hunting

Photography Composition Essentials : Depth or Perspective

This post is second part of the series ‘Photography composition essentials‘. You can find other parts here.

If your photograph engages a viewer more than 5 seconds, it means it has something for the viewer to look into. If we keep aside the story part and strictly look into the aesthetic aspects of a photograph, what composition rule or principle actually responsible for all that viewer’s attention? It is Depth or Perspective in a photograph.

As we all know, a photograph is a two dimensional plane and normally it doesn’t fully recreates the actual emotions of what we saw at that time ( and it never will. That’s why we should enjoy the process of taking photographs whether we get a shot or not). If anything that can help viewer to feel a little bit of reality in a photograph, then it is DEPTH. It is the THIRD dimension of a photograph and one of the key composition rule in photography.

What Depth really offers to the viewer is an artist’s preferred way to look into the picture. The user starts from foreground, moves towards the subject and then the rest of the information is filled in by the background. The only thing that is important is actually the relation of all these elements to fill in all the missing parts.

I actually didn’t notice that much about depth before I decided to write a post on it. I was merely using it for the aesthetic aspect of my photographs. But when I actually start thinking in more detail, I started to embrace its value even more. It prepares a ground for every picture and convince the viewer that this picture is a piece of artwork and not just another snap. It separates a good luck artist from a photographer that is consistently producing good pictures.

I am a landscape lover and I do agree that a lot of the time I get good photographs by chance 🙂 and instead of taking consistently good pictures by doing my homework, I am used to increase my chances by taking MORE pictures. That’s how I used to cheat my luck because it gives me the same net results. But this approach actually hurts you when you try to go PRO because you can’t come again and again to same location and try your luck when you do professional work. That’s why people willing to hire professionals because they give them sure results the first time they get a chance.

So if you want to be a PRO then start taking it more seriously and try to conceptualize the photograph before lifting your camera to your eye. Check whether you got enough DEPTH in your photograph that can engage viewers and if not, move towards some different angle or location until you find a decent spot to convey a reasonable DEPTH.

SO now I am going to show you some of my images that in my opinion have decent depth aspect. Keep in mind that I am not a PRO and I am still working on my stills.

1. Muttrah Corniche Sunrise , Oman

IMG_8047)72dpi
Muttrah Corniche by Imran Zahid

It starts with a boat (foreground) moving through the restrooms / parking (middle ground), all the way to the distant trees mountains and beautiful clouds (Background). All these things are related and complement each other. They depict the typical setting of a beach-side resort. The shoreline here is connecting all these levels together making it one complete picture.

2. Sur Sunrise , Oman

Silhouette-sunrise
Sur Road by Imran Zahid-The Shades Photography

Here the road is leading towards the main subject i.e. Sunrise (Background) but instead of just a plain sunrise it leads towards it through a person standing (foreground) and town houses (middle ground). So it conveys enough details for viewer to observe. The on-going street light gives a sense of distance between all these levels.

3. Sidaab Street , Oman

Sidaab Street by <a href='https://theshadesphotography.wordpress.com/'>Imran Zahid-The Shades Photography</a>
Sidaab Street by Imran Zahid-The Shades Photography

This is sidaab street in Oman that leads to the Royal Palace. The main subject of this picture is actually the road and the journey (middle ground) but to create enough interest I put a car tire (foreground) and mountains and clouds (background). The street lights provides a sense of distance among foreground/middle ground and background.

4. Why So Serious , Quryaat Road Oman

Quryaat Road by <a href='https://theshadesphotography.wordpress.com/'>Imran Zahid-The Shades Photography</a>
Quryaat Road by Imran Zahid-The Shades Photography

I guess by now you know that I am obsessed with roads and I accept that I love roads and I found them to be a very attractive subject when it comes to depth and perspective. Here off-course that car with a smiley spare wheel is the subject (middle ground) along with the road in front (foreground) leads towards the subject and all the way to the mountains (background).

OK, enough of landscapes and roads. Now I am going to show you some examples from street/people photography too.

5. The fisherman , Sifah beach , Oman

15817282539_a328351f1e_z
The Fisherman by Imran Zahid

Here there are no leading lines but from the proportion it is clear that fisherman on left is our subject(foreground) which is complemented by the boats (middle ground) and it goes towards the sea where he used to do fishing. All levels are perfectly related and gel together.

6. Muttrah Fish Harbour , Oman

Mutrah Fish Market by <a href='https://theshadesphotography.wordpress.com/'>Imran Zahid-The Shades Photography</a>
Mutrah Fish Market by Imran Zahid-The Shades Photography

The people here are either fishermen who came from fishing trips or the buyers who wants fish. The composition is simple. It starts with harbor (foreground) towards subject( which are fishermen in middle ground) all the way to water and their ships (background). No need to explain further.

Conclusion

I hope I made my point pretty clear now that when I am talking about DEPTH or perspective in a photograph, I am referring to all these levels (fore/middle/background) and their relationship with the entire picture. That makes a photograph complete and it makes people believe what they are witnessing. It makes it more interesting and entices them to look into each and every detail of a photograph.

You have some good examples of depth in a photograph? Do share with me 🙂

Oman for Photographers

Note: For customized photography tour in Oman, please check out my post ‘Photography tour in Oman

If you just moved to Oman or planning to move here and you are addicted to photography as well then chances are that you are looking for places where you could satisfy your appetite for photography.

The good news is, Oman is an ideal place for photographers. Whether you are interested in Landscapes, street, culture or portraits. You will find ample amount of photographic opportunities in here. The locals here are quite friendly and you will not find any difficulty while interacting with them provided you respect their traditions and cultural values. You don’t have to worry about any Law and order insecurities as well.

I have been working here for quite some time but I started photography a little more than a year ago. During my time here I happen to visit quite a few places and I do visit them regularly to keep my photo stream up and running. For long time ,I have been thinking about making a list of places that are good for photography tours.  After a lot of brainstorming I decided to categorize my list according to type of photography and write City names against it. That list will guide anyone who is new to Oman to plan their trip in advance. Off course if you have a good eye you can get any type of images anywhere but this list is just a quick start guide for photographers who are new to Oman.It is a work in progress and I hope a lot of my friends in Oman could correct me and guide me to make this list even better and more useful.

P.S This post contains mine as well as lot of other photographer’s images . All the images have copyrights to their respective owners. I have tried to give due credit to each one of them by linking back their respective business / Facebook pages. If you don’t want your image to be included here for any reason or want to change something about it,PM me or drop a comment and I will do the necessary.

Beaches / Corniches

Oman has some of the most stunning and breathtaking beaches in the world with its coastline stretches to more than  3000 km.They are known for their purity of sand,scenic nature and sturdy surrounding rocks.If you are into seascapes, there is no better place than Oman for you 🙂 I am listing just a few well-known beaches here.

  • Yiti (Muscat)
  • Jabal e Sifah beach (Muscat)
  • PDO beach (Muscat)
  • Al Bustan Beach (Muscat)
  • Qurum beach (Muscat)
  • Qurum Corniche (Muscat)
  • Mutrah Corniche (Muscat)
  • Al Mughsail Beach (Salalah)
  • Taqah Beach (Salalah)
  • Sawadi Beach (Barkha)
  • Ras ul Hadd (Sur)
  • Ras ul Jinz (Sur)
  • Sink Hole (Sur)
  • Duqm Beach (Duqm)

Mountains and Wadis(valleys)

After seasides and beaches , if there is one thing that definitely draws your attention are the beautiful Wadis (valleys) and majestic mountains in Oman. You will find these almost everywhere in Oman. Some of them are totally developed into tourist attractions while others remain quite untouched in their natural state.

  • Wadi Shab (Tiwi)
  • Wadi bani Khalid (Wadi bani Khalid)
  • Wadi Arbeieen
  • Jabal e Shams (Alhamra)
  • Jabal e Akhdar (Alhamra)
  • Wakan Village (Nakhal)
  • Wadi Darbat (Salalah)
  • Marneef Cave (Salalah)
  • Wadi Dayqah Dam (Dayqah)
  • Quryat Dam (Quryaat)

Architecture

Oman has given special attention to preserve its ancient and traditional values when it comes to preserving its architecture. You will observe this vary principle while visiting various mosques , forts and markets. Along with its oriental nature , you will notice that they are against high rise buildings and that is one interesting thing that sets Omani architecture apart from other Gulf states and creates its own charm.

  • Nizwa Fort (Nizwa)
  • Bahla Fort (Bahla)
  • Nakhal Fort (Nakhal)
  • Jalali Fort (Muscat)
  • Sur hanging bridge (Sur)
  • Sultan Qaboos Grand Mosque (Muscat)
  • Said bin Taimour Mosque (Muscat)
  • Al Ameen Mosque (Muscat)
  • Opera House (Muscat)

Old Souqs (Markets)

Being Traditionalist in practice, Oman is  rich in culture and heritage. It has a number of sites listed in UNESCO world Cultural and heritage sites including some of the oldest souqs (markets) which includes.

  • Mutrah Souq/market (Muscat)
  • Nizwa Souq (Nizwa)
  • Matrah Fish Market (Muscat)
  • Al Hafah Souq (Salalah)
  • Sohar Handicraft Souq (Sohar)
  • Al Rustaq souq (Rustaq)

Resorts

So up till now we have been looking for natural beauty in beaches , mountains, wadis and all that architecture and cultural heritage .But if you are that exotic type of person who likes to get comfortable in big resorts, Oman has a lot to offer.Below are some of the best resorts in Oman.

  • Rotana Resort (Salalah)
  • Sifawy Boutique Hotel. (Muscat)
  • Barr Al Jissah Resort and Spa. (Muscat)
  • Al Bustan Palace (Muscat)

Deserts

No middle eastern country is completed without its Deserts and Oman has its fair share of Deserts too.You will find some of the exotic desert safari locations in these sand driven areas.Some of the major deserts are.

  • Wahiba Sands
  • Hema Desert

Famous Parks & Streets

  • Qurum Park (Muscat)
  • Riyam Park (Muscat)
  • Naseem Park (alAmraat)
  • Al Sahwa Park
  • Alkhawair Street(Muscat)
  • Al Amaraat Street (Amraat)
  • Sidaab Street (Mutrah)

 Credits

I am thankful to following photographers at (Friday Shoot Out) FSO Muscat whose images I have used here along with mine with permission.

Krishnakumar Omanakuttan – krishnakumar photography
Prakash Wadhwani – Prakash’s Stolen Moments
Nilesh Potdar
Sunil S Rao – Prismphotos
Baiju Jose
Shiekh Mohammad Haris – SMH Photography
Benito Hermis – 500px
Guru Acharya – Guru Acharya Photography
Uwe Richter
Henz B Solih

If you have any correction or you went to some place in Oman and have amazing pics.Do send me your images and location name and I will accommodate it here.

Why silhouettes are beautiful

I love silhouettes as much as I love shooting in black and white. They are unorthodox. They don’t have much definition but they contain much more drama. Whats actually amazing about silhouettes is that rather than major attention on subject , the actual center of attraction is background.This makes it more interesting and different. It definitely adds more shapes and form to your photograph. They convey a message in an artistic manner and let the viewers’ imagination to fill up the details and complete the story. Its a classic text book example of LESS IS MORE.

So, if you like silhouettes and you want to capture them with their full potential. Below are some pointers that you should keep in mind while doing silhouette photography.

1. Look for high contrast (obviously)

IMG_3980
Mutrah Corniche by Imran Zahid

Yes it is pretty obvious but it is very important and that is why I started with this point. A lot f people are actually selecting a wrong subject against wrong backdrop. The low contrast situations are good for portraits and may be for landscapes too but its a big NO in silhouettes.  So first of all start with a high contrast situation.

2. Choose an interesting background

IMG_sunrise_72
The Rising by Imran Zahid

Remember visually silhouettes are more of a background than foreground.Background is roughly the 80% of a silhouette photograph.So pay close attention to your background.If it is not interesting enough than you couldn’t able to make a strong photograph. Sunsets and sunrises are so much popular as silhouette backgrounds because they have very dramatic background which makes photograph visually appealing.Your subject doesn’t have details so its the background that has to fill this void visually. Select backgrounds that are strong in color and texture to make an impact.

3. Look for familiar shapes for silhouette

15616875214_c7bf1267de_z
The Lone survivor
by Imran Zahid

Shape familiarity is the key. Silhouettes are definition-less.They only have shape and that’s it.Look for subjects in silhouettes that everyone is aware of of and just by looking at it anyone can know what it is. If a viewer has took close enough to recognize it , the photograph will fall flat.Internet is filled with silhouette photography having people,animals and trees as silhouettes for the vary same reason. Your subject should have a very definitive shape with string outlines.Don’t depend on the intelligence of viewers.Make it as obvious as you can.

4. Use negative space to your advantage

15453828827_207bbaa581_z
Ras ul Hud beach by Imran Zahid

There is so much I want to emphasize about negative space.Refer my post Photography Composition Essentials: Negative Space . Negative space is actually a breathing space in your photograph. It is a place where viewer’s eyes can rest after observing other details in photograph. It will actually calm down your eyes and ease your mind. It brings a sense of serenity to image. Use it to your advantage.The smaller the silhouette in your photograph the better. But place it on the strongest position where it can make maximum impact.

5. Experiment a lot

TheCave
The Cave by Imran Zahid

Don’t just limit yourself to sunrises and sunsets.Yes they are interesting and they have beautiful colors in it but there are lot more opportunities to do silhouettes. Just look for it. For example, the above Cave picture is simply shot in heavy fog. You can experiment with fog,rain,a lot of smoke and practically anything that reduces definition from your subjects. Introduce a little reflection or shadows and it will spice it up the whole photograph. Break the cliches. Try to come up with your own ideas and remember : RULES are meant to be broken.

IMG_7019

Amazing resources on internet

Up-til now I only presented you with my photographs.The internet is filled with amazing silhouette photography.You can find some of the finest examples on this subject .So , apart from my own photographs  ,I am giving away some of the reference of stunning silhouette collections you can look into for your inspiration.Do submit your own silhouette images and i will add them here in specific examples.


The Power of Black and White photography

I love black and white (  monochrome ) photography a lot. I can’t help it. Whenever I start post processing any of my photograph I always first try to convert it to black and white and see if it looks good or not. I was wondering lately, why I like some pictures more in black and white than in color. This question is very important because it gives the answer for which type of photographs we should convert to black and white and why. So I came up with some of the reasoning that I hope you will find useful and insightful. Feel free to play around with these ideas.

1. It reduces distraction.

15118342204_8d419c7ab7_b_d
The Aim by Imran Zahid.You see how it reduces the distraction of different color clothes of all these people and help you focus of the subject.

Ever wonder why most of the street photography is in black and white? Because in street photography we have very less control on environment. You can’t control the annoying and distracting bill boards and ads all around street. You can’t control the colorful cars and other stuff that grabs all the attention instead of your subject. Yes you can control these things by changing your viewpoint and angle and all that but still most of the time you don’t have that much time and you want to grab the moment quickly. So it helps in saving some of your shots that otherwise don’t work in color. But don’t make it an excuse to not think before shoot in street photography.

2. It helps you emphasize more on story than visual

IMG_0670
Contemplation by Imran Zahid.

In black and white photograph, visual candy is not there so viewer can concentrate more on the story and emotion behind the photograph rather than aesthetics. This where composition became so much important because it’s the only way to tell viewers about the main subject and story.

3. It brings a world unknown to us

15915231572_f450b356ff_b_d
Down the memory lane by Imran Zahid
IMG_7841 - Copy-3
The Journey by Imran Zahid

We as human beings are bound to see things in colors by default. Black and white brings a whole new world in front of us that we are unaware of. It makes it more uncertain and exciting for us to see things in entirely different way. It brings that antique and classic look into the pictures which make them timeless and precious. That’s how our mind works when we see any black and white photograph.

So these are the main reasons why we like black and white photographs. The photographs that tell story bound to have these characteristics and are best suited for monochrome treatment. Now here is the list of techniques that you can employ to create really stunning black and white photographs

1. Composition

palace (2)
The Road by Imran Zahid

Composition is everything in any type of photography and in black and white, it is literally everything because you don’t have colors to complement it. All you have is composition. Through proper composition you can direct the viewer to observe certain parts as subject and remaining as background. Placing a subject to the strongest part in frame and arranging other elements is really important and it makes or breaks any image. Rules of composition like rule of thirds, leading lines and negative space are the key to black and white photograph.

2. Contrast

tea_making
Tea making by Imran Zahid

Black and white photography is all about contrast. The more the better. A lot of shades of grey will not make a dramatic black and white photo. Drama starts where there is more contrast, more blown out and darker areas. These imperfections are actually the one that creates emotions in black and white photography. Always look for contrast in a photo. One tip regarding exposure. Expose for lighter areas as you can recover details in darker areas more easily in RAW files as compare to recovering highlights. Another tip is to shoot in RAW format and set built in black and white option. That way you can see the result immediately and even if you want color RAW file always contains color information. One final tip regarding conversion to B&W is to use separate color sliders after conversion to adjust certain parts of image like blue color to adjust sky. Also you can use luminescence sliders to adjust areas by their brightness.

3. Convey an emotion or story

18622493935_a0f24aa9a8_z
Wisdom by Imran Zahid

Since a black and white photograph doesn’t have colors so you cannot just purely depend on visuals. You need to convey some story or some emotion else your photograph will fall flat. It doesn’t have to be a photo journalistic in nature. A simple smile or some interesting character in its surrounding is more than enough but make sure it conveys enough details.

4. Look for strong shapes and texture

TheCave
The Cave by Imran Zahid

Strong shapes and lines and curves always makes a photo more interesting. In black and white it is much more prominent as these strong lines and curves actually defines edges and separates one object from another. So try to integrate some strong lines and shapes for better definition and detail. Texture is also more observable in black and white photograph than in color.

5. Look for some interesting light

15486699860_874eb5331b_z
Walking Shadows by Imran Zahid

Try to look for dramatic/directional lighting source in your photograph. Directional light defines edges more clearly and hence bring details and definition in your objects. It can bring contrast in your photograph. Also dodging and burning is one classic technique that a lot of black and white photographers use to highlight the areas in image that they want their viewers to concentrate more on.

So here it is . Everything I know and discovered about black and white photography over the time. If you didn’t tried it. Do it. Its worth it. Its a bit difficult in some respects but its timeless.Its creative and worth giving a shot. Feel free tp pitch your ideas in comments sections.


Photography Composition Essentials: Negative Space

15453828827_207bbaa581_z

I am a big fan of composition articles on internet as I consider composition as one of the most important topic in photography. If there is only one thing that can create the biggest impact on your photography m then it is composition. It is the key to successful photographs. I do agree that lenses, camera bodies and other accessories do affect your photography to a certain level. But if you don’t want to spare a dime and still want to make huge difference than start concentrating on your compositions from now on.

In fact , it’s a good exercise and challenge for all of us who are suffering from GAS (Gadget addiction syndrome) is to stop looking for good and cheap deals for camera bodies and lenses and start giving more attention to our COMPOSITIONS. Just make a promise to yourself that for the next six months I will not buy any new equipment and just experiment with composition techniques to make my photographs stronger than before. After this , you will be amazed how much this will affect your photography in the long run.

So to start with myself, I am starting a series of posts on composition techniques of photography. I will try to write one post every week for each technique and attach some of my own photographs for samples. You guys can post your stuff in comments and I will add them here as well. Since I am a big fan of minimalism, I will start off with NEGATIVE SPACE.

Negative Space:

Negative space is actually a breathing space in photograph. It is a place where viewer’s eyes can rest after observing other details in photograph. It will actually calm down your eyes and ease your mind. It brings a sense of serenity to image. The viewer will feel more comfortable and can concentrate more on the subject rather than wondering around distractions. Check out some of my samples and observe the use of negative space in composition and do submit your so that I can attach them too for better understanding.

15616875214_c7bf1267de_z
lone survivor by Imran Zahid
15842713043_75976e3cf1_z
Yiti beach by Imran Zahid
15881167768_ee875a0d92_o (1)
Fishermen by Imran Zahid
15742645453_5db7bbd1aa_z
Standing tall by Imran Zahid
15520761179_b54d768f4d_z
Why so serious 🙂 by Imran Zahid

A beginer workflow to STREET Photography

Street photography is one of the most feared and uncertain type of photography in which almost nothing is in your control and almost everything is based on luck. A lot of new photographers who like street photography because it’s classy/candid look and feel are very nervous because it demands too much time and luck.

Also the success rate of these types of shots is also very low as you get a lot of crappy shots when you come back home and try to edit them. A lot of factors are there that can go wrong very easily like improper focus, background distractions, photo bombing etc not to mention a lot of time you need to face people’s anger and sometime security issues. But guess what? That is the reason that makes street photography so much satisfying and fulfilling because after so much frustration when you get proper shot it worth a lot. You can easily compete with any professional photographer if you have a decisive street photography shot.

Like any field, if you carefully analyze the problems, you can come up with some workflow that will produce maximum results with very low chances of getting things wrong. I am by no means a pro street photographer but over the time I have come up with a workflow that works for me most of the time.

Look for interesting faces / Emotions.

This is by far the easiest step in getting interesting photos. Look for older people or children. Their faces are very expressive. Also people with unique clothes and emotional state make your photos pop because of their unusual settings.

15552658549_39ea2afc08_z

Look for related or contrasting background and foreground interest.

Street photography is all about complete environment. You should try to guide viewers from subject to background. And to do it seamlessly your background should be related. Highlight your subject but try to put some meaningful and unobtrusive background as well. Don’t try to completely remove it or use too simple background, as it kills the purpose of street photography. Also sometimes a very contrasting background makes a strong visual statement as well. Play carefully within limits.

Look for some truly beautiful geometric composition.

This is where street photography gets visually very interesting. But it’s also very difficult and if you nailed down this aspect you will get a master piece. Composition is always the key.

15486119148_da71d38fd1_z15135384124_cca1d80b06_z

Look for some tried and tested conditions.

Look for some unique shadows or nice reflections on glass or stagnant water on streets. Contrasting lighting conditions both during day and night is also very dramatic. Symmetry and repetition is also very pleasing to eyes.

15486699860_874eb5331b_z15848445992_e4065f61f6_z

Shoot in both Color and black and white

Its very tempting to always shoot in black and white because it looks classic and it suppresses a lot of background distractions. But a part of these two reasons, try to learn other aspects of B&W also like shadows, textures and contrast. B&W tends to look a little more sharp as well. But color has its advantages too. Sometimes a photo with color is more interesting than B&W as its more natural cause we used to see in colors.

15635607914_18d7c4e370_z15899694386_887740328b_z

Always wait for the DECISIVE MOMENT.

This is by far the most important point of street photography and the whole topic revolves around it and that is why I make it a separate heading and not a pointer .Before clicking just think is it the right time to take it. How it will work if I wait a little longer or If I click a little earlier. If it makes a difference, do it accordingly. This is the point that actually creates a story.

8028796793_a7ededfa93_z8028796404_f3bacc0551_z

Below are some of the side thoughts that you should keep in mind and that will come handy all the time.

1.       Be courteous to your subjects at all times. Don’t try to exploit them. If they don’t want to be photographed, leave them alone. You will get a million other opportunities. Be ready to say sorry and smile and never confront with local people.

2.       Make yourself familiar with that place. A little planning will never hurt. Try to come to same place again sometime. You will be already familiarized with locations and its settings. That will help you to plan your shot in advance.

3.       Talk to people after you photographed them. Give them your business card. Ask them if they want these photos and send them later through email as a courtesy. Make them friends. It will be much more fun and less daunting.

Conclusion

Don’t expect that every time you go out for street photography, you will get some master pieces. It’s very difficult, so be patient and try to enjoy the whole process of getting shots and not just the final shots. Try to improvise as you learn. These are just few pointers that I compiled because they worked for me. Try to come up with your own tips and tricks. I am working in Middle East where people are generally not very friendly and they are suspicious of camera as well. But if you have a nice friendly smile on your face and you are not intruding their personal space aggressively than its very a enjoyable process and not to mention that final result is much more satisfying.

Sigma-17-50mm-f2.8 EX DC OS HSM Lens Review

sigma-17-50mm-f-2-8-ex-dc-os-hsm-lens

Sigma-17-50mm f2.8 EX DC OS HSM lens is one of the most successful sigma general purpose lens for any crop sensor camera produced by sigma ever. I bought this lens 6 months ago and since then it is most widely used lens on my canon 600d. Its razor sharp . It has good Optical stabilization. Very good build quality and a bit heavy but any good lens with these qualities normally has some weight because of all the internal mechanisms. It is definitely the best lens if you are moving from kit lens. Although the focal range is pretty much the same as kit lens so a lot of new comers hesitates to buy this as they are looking for some different focal length and hoping that the different focal length will improve their shots . But believe me this lens can take your photography to new level altogether. The amount of sharpness and saturation that you will get with this is simply amazing.
Below is the complete nomenclature of this lens  as appeared on Sigma’s website.
  • DC:These are special lenses designed for APS-C size sensors so that the image circle matches the smaller size of the image sensor of most digital SLR cameras. Their specialized design gives these lenses the ideal properties for digital cameras, the compact and lightweight construction is an added bonus!
  • EX:The exterior of this lens is EX-finished to denote the superior build and optical quality, and to enhance its appearance.
  • HSM:This lens uses a motor driven by ultrasonic waves to provide a quiet, high-speed AF.
  • IF:To ensure stability in focusing, this lens moves the inner lens group(s) without changing the lens’ physical length.
  • OS:This function utilizes a built-in mechanism that compensates for camera shake. It dramatically expands photographic possibilities by alleviating camera movement when shooting by hand held camera.


I am not going to give a lot of comparison details as I find it useless but I will show you some of my shots taken from this lens and even after that if you are not satisfied, I will share some links to very detailed reviews that you may find helpful.All these photos are taken by me on Canon 600d with this lens.


20759287458_4f84553b3e_z
Ras ul Hudd beach, by Imran Zahid
20105306096_38ac140427_z
Salalah by Imran Zahid
18402764809_2c55ce1c35_z
Tribesman by Imran Zahid
17802938358_87fa156e6c_z
the Kid
18622493935_a0f24aa9a8_z
Wisdom

You can ask any query regarding this lens on my email

Blog at WordPress.com.

Up ↑