Why ISO is Not as Important as photographers think?


ISO, one of the pillars of exposure, often perplexes photographers. Misconceptions about its significance can hinder creativity. This article unlocks ISO’s secrets, explaining its role in exposure, its effects on image quality, and creative applications. Whether you’re a novice seeking clarity or a seasoned photographer aiming to push boundaries, understanding ISO is key to capturing stunning images. Dive in to elevate your photography skills.

I. Introduction

  • What is ISO in Photography?
  • Common Misconceptions about ISO

II. The Role of ISO in Exposure

  • ISO’s Influence on Exposure
  • ISO and Image Quality

III. ISO and Noise

  • Understanding Image Noise
  • The Trade-Off: ISO vs. Noise

IV. Modern Camera Technology

  • Advances in Sensor Technology
  • In-Camera Noise Reduction

V. The Importance of Proper Exposure

  • Balancing ISO with Aperture and Shutter Speed
  • Overcoming Low Light Challenges

VI. Creative Use of ISO

  • Using ISO for Creative Effects
  • Experimenting with High and Low ISO

VII. Conclusion

  • ISO as a Tool, Not a Limitation
  • The Bigger Picture in Photography

I. Introduction

What is ISO in Photography?

ISO is one of the three key elements of exposure in photography; also know as the exposure triangle, along with aperture and shutter speed. It measures the sensitivity of your camera’s sensor to light. In the digital era, ISO is no longer associated with film sensitivity but rather with how your camera’s sensor amplifies the incoming light. A lot of people thinks ISO is essentially a bad side effect but little people know you can always experiment with high ISO if you don’t have the option of adding artificial lights.

Common Misconceptions about ISO

Many photographers, especially beginners, tend to overemphasize the importance of ISO in photography. They often believe that higher ISO settings are essential for better photos in low-light conditions. However, understanding the role of ISO and its limitations can lead to more informed and creative photography.

II. The Role of ISO in Exposure

ISO’s Influence on Exposure

High contrast image with histogram

ISO plays a critical role in achieving proper exposure. It allows you to adjust the sensitivity of your camera’s sensor to match the available light. Higher ISO settings make the sensor more sensitive, enabling you to capture images in dimly lit environments without the need for slower shutter speeds or wider apertures.

ISO and Image Quality

Qantub beach by Imran Zahid-The Shades Photography

While ISO provides flexibility in challenging lighting situations, it’s essential to recognize that increasing ISO comes with a trade-off. Higher ISO settings can introduce digital noise, which manifests as grain or speckles in your photos. This noise can degrade image quality and detail. But there is a unique characteristic of noise. It doesn’t look bad on black and white images. If you don’t have any other option than you can always convert your images to black and white in order to minimise its damage. It also looks classic and timeless.

III. ISO and Noise

Understanding Image Noise

Image noise is the unwanted variation in brightness or color that appears as specks or grain in a photograph. It becomes more noticeable as you raise the ISO setting. Noise can compromise the clarity and sharpness of your images, particularly in areas with low contrast.

There two types of noise. Color noise and luminescence noise. The alter will just ad grains where as former will add red and blue color grans that sometimes alter the general color tone of an image.

The Trade-Off: ISO vs. Noise

Balancing ISO with the need for noise-free images is a constant challenge in photography. Understanding that higher ISO settings may result in more noise should encourage photographers to explore alternative techniques, such as using a tripod or external lighting, to maintain image quality.

There will be a situation where you need to increase ISO to avoid slow shutter but increasing it in small amounts will do the trick. Always check your camera for maximum ISO that gives usable images,

IV. Modern Camera Technology

Advances in Sensor Technology

Modern cameras are equipped with advanced sensors that offer better low-light performance compared to their predecessors. This means you can shoot at lower ISO settings in challenging conditions while still achieving excellent results. Sony and nikon are famous for their sensors that works really great at high ISOs.

Full frame cameras are much better at handling high ISO numbers.

In-Camera Noise Reduction

Many cameras now include in-camera noise reduction features that can mitigate the effects of high ISO. These technologies analyze and reduce noise during image processing, improving the final image quality. But there is a downside to it, In-Noise reduction not only reduces noise but reduces details as well. Making it more like a painting than a photograph.

reduing noise later to your taste in post processinf is always a good choice.

V. The Importance of Proper Exposure

Portrait of an Old Man at Nathia Gali, Pakistan

Balancing ISO with Aperture and Shutter Speed

Achieving a well-exposed photograph involves finding the right balance between ISO, aperture, and shutter speed. By understanding how these three factors interact, photographers can control exposure while minimizing noise.

Overcoming Low Light Challenges

Photographers often use slower shutter speeds and wider apertures to compensate for low light conditions before resorting to high ISO settings. These techniques can produce noise-free images with proper exposure.

VI. Creative Use of ISO

Using ISO for Creative Effects

ISO isn’t just a tool for challenging conditions; it can also be harnessed creatively. High ISO settings can introduce grainy textures for a vintage or artistic look, while low ISO settings can produce exceptionally clean and detailed images.

Experimenting with High and Low ISO

Photographers should explore the full range of ISO settings to understand their creative potential. Experimenting with different ISO values can lead to unique and visually striking results. Usually full frame cameras render better results in high ISOs because of their larger sensors. That’s the main reason why all PROs tends to use full frame cameras. But you should always experiment wiht your camera ISO range and see what maximum ISO number can render you useable results.

VII. Conclusion

In conclusion, while ISO is undoubtedly a crucial element of photography, it’s essential to demystify its significance. Understanding that ISO is not the sole determinant of image quality empowers photographers to make informed choices based on the creative vision and the specific requirements of each photographic situation. Instead of viewing ISO as a limitation, consider it as a versatile tool to achieve your desired results, whether that involves capturing a fleeting moment in low light or adding a touch of character to your images.

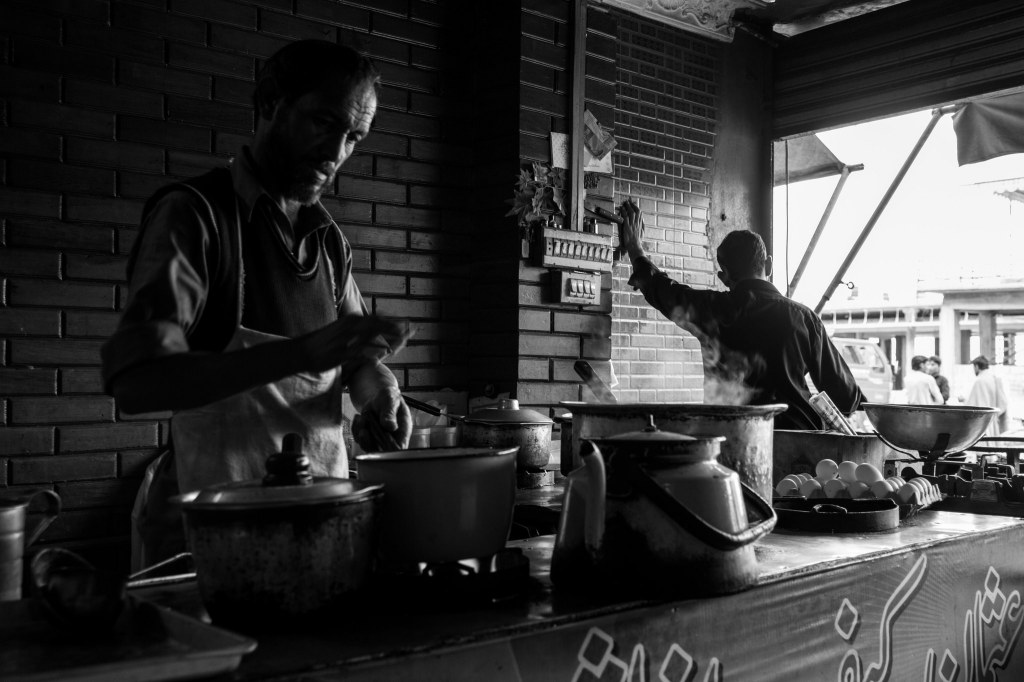
How to Make Money with Street Photography

Street photography is an art form that captures candid moments in public spaces, often reflecting the essence of everyday life. While it’s primarily a passion for many, did you know that you can also turn your love for street photography into a source of income? In this article, we’ll explore the exciting world of making money with street photography and guide you through the steps to achieve success in this niche.

Introduction

What is Street Photography?

Street Photography definition is probably the most debatable one. In a sense it occupies almost everything that happens on street. It focuses on capturing unscripted moments in public spaces. It’s about telling stories through images, often highlighting the beauty in the ordinary and the unexpected. Street photographers roam the streets, parks, and alleys, seeking to freeze moments in time that others might overlook.

The Allure of Street Photography

There’s a unique charm in street photography. It allows you to observe the world from a different perspective, paying attention to the details that often go unnoticed. Street photographers are like modern-day urban storytellers, using their cameras to document the world’s ever-evolving narratives.

Can You Really Make Money with It?

Yes, you can. While street photography might not be the most conventional path to financial success, it offers numerous opportunities to generate income. From selling prints to licensing your photos for commercial use, there are various avenues to explore.

Getting Started with Street Photography

Choosing the Right Equipment

Before you start your journey into street photography, it is important to have the right gear. That will decide which tyoe of photgraphs you will get easily. While someone prefer high-end cameras, others have achieved remarkable results with more compact setups.

Over the years, I prefer cheaper and more basic camera than an expensive one. People usually don’t notice cheaper and compact cameras and become more open to be photographed.

Learning the Basics of Photography

To excel in street photography, you should understand the fundamentals of photography, including composition, exposure, and lighting. Along with this, timing is something that is of utmost importance in street photography. Familiarize yourself with your camera settings to ensure you can capture those fleeting moments effectively.

A lot of photographers use manual mode with pre configured focus distance so that yu can capture the moment with focus hunting even in low light. Others put ISO to large numbers so that the moment can be captured with high shutter speed. Check out few techniques here.

Finding Your Niche in Street Photography

Street photography is incredibly diverse. Some photographers focus on capturing portraits of strangers, while others document urban landscapes. Finding your niche within this genre can help you stand out and attract a specific audience.

In begining, don’t limit yourself to just one niche. You can always copy the basic idea for photographers that you follow but trial and error is the key. Try as many new areas as possible. In this proces you will find what you truly like and then focus on that in detail.

Building Your Street Photography Portfolio

Capturing Compelling Moments

Creating a portfolio of stunning street photographs starts with your ability to capture compelling moments. Learn to anticipate scenes and react quickly to document the perfect shot. Patience and persistence are your allies.

Try to pick a corner on stret and spend sometime on it. Observer the activities and try to anticipate what’s interesting is going to happen. Frame your shot in advance and just wait for right moment, Change your location every 20 minutes or people will start noticing you.= and become uncomfortable.

Developing a Unique Style

Your style is what sets you apart from other street photographers. Whether it’s the way you use color, framing, or storytelling, developing a unique style can make your work instantly recognizable.

A lot of people use black and white photography. Usually it hides a lot of ugliness in frame because you have little control over background. Also people try specific color grades like Alen palender using muted colors for his photographs.

Try to experiment and come up with something unique and practicle.

Telling Stories Through Your Photos

This person was in a hurry to join his flight when I captured him. You see ow walking and planes in background related to each other.

Great street photography tells stories. Learn to observe and convey the emotions, narratives, and messages within your images. Your photos should evoke feelings and provoke thoughts in your viewers.

Your stories doesn’t have to be very epic and documentary style. Just a emotion is more than enough. Try to check if background can ad something to it or not. If Yes, then very good other remove background clutter by moivng closer.

Online Presence and Branding

Creating a Photography Website

To showcase your work and attract potential clients, consider creating a photography website. It’s your online presence, and it should demostrate your style and personality as a photographer.

Some of the online services that you can sue are

  1. WordPress
  2. SquareSpace

It really makes a difference when client sees your profile in a way you want them to see. The packages are quite customizable according to your need. And you can integrate online stores or donations as well.

Leveraging Social Media Platforms

Social media is a powerful tool for photographers. Establish a strong online presence through an active social media profiles. Share your portfolio and engage with potential clients. Use platforms like Instagram and Facebook to share your work, engage with your audience, and connect with potential clients.

Building Your Personal Brand as a Street Photographer

You see how all of these photos are similar in terms of color theme and processing style.

Your personal brand is your identity as a photographer. It encompasses your style, values, and the stories you want to tell through your work. Building a strong personal brand can help you stand out in a competitive field.

Try to create a specific style in your photographs. You may not be able to pull off this thing everytime but over the period of time you will have enough photos that show cases your specific style.

Monetizing Your Street Photography

Selling Prints and Art Exhibitions

One of the most direct but also the oldest ways to make money with street photography is by selling prints of your work. Its very lucrative but tat the same time very few people now a days go to actual galleries to purchase those. You can also consider exhibiting your photographs at local events.

Licensing Your Photos

Many businesses and publications are willing to pay for high-quality street photography. Licensing your photos for commercial use can provide a steady stream of income.

500px is one such website. But at the end, it depends upon public demand. You can also try stock photography websites for that.

Offering Photography Workshops and Tours

If you’re an experienced street photographer, you can share your knowledge and skills by offering photography workshops and tours. This not only generates income but also builds your reputation as an expert.

I am conducting Steet Photography workshops / photowalks in Oman for quite sometime. You can find the details here. Photography tour is a relatively new concept but its gaining momentum recently. People who are interested in photpgraphy and travelling wants some seasoned photographer to show various parts of city that are photogenic. You can tap that market if you are familiar with your location in terms of good locations suitable for photography.

Networking and Collaboration

Networking with fellow photographers can open up opportunities for collaboration and learning. Attend photography events and join online communities to expand your network.

Collaborating with businesses and publications can lead to paid assignments. You might be asked to shoot promotional campaigns or contribute to magazines and websites.

Participating in photography communities and contests can help you gain recognition and exposure. Winning or being featured in contests can boost your credibility and attract clients.

Overcoming Challenges

Dealing with Legal and Ethical Issues
Street photography can raise legal and ethical concerns, especially when photographing strangers without their consent. Be aware of the laws in your area and respect people’s privacy.

Handling Rejection and Criticism
Not every photograph will be a masterpiece, and not every opportunity will lead to success. Learn to handle rejection and criticism constructively and use it as a stepping stone for improvement.

Staying Motivated During Slow Periods
Like any creative endeavor, street photography has its ups and downs. During slow periods, stay motivated by exploring new techniques, revisiting old projects, or taking a break to recharge.

Conclusion

In conclusion, making money with street photography is both challenging and rewarding. It requires dedication, skill development, and a strong online presence. However, with the right approach and perseverance, you can turn your love for capturing candid moments into a fulfilling and profitable endeavor.

How to Start a Portrait Photography Business

With the advent of extremely capable mobile phone cameras, photography has become more accessible than ever. Anyone with good aesthetic sense wants ot convert their passion for photography into a profitable venture. Having said that, one of the most rewarding niches in photography is portrait photography.

This article will guide you on how to start a successful portrait photography business, from honing your skills to establishing your brand and managing your operations effectively.

  1. Understanding Portrait Photography
    • What is Portrait Photography?
    • The Importance of Portrait Photography
  2. Getting Started: Your Photography Skills
    • Mastering Your Camera
    • Developing Your Eye for Composition
  3. Business Essentials
    • Legal Requirements and Permits
    • Creating a Business Plan
  4. Setting Up Your Studio
    • Location and Space
    • Equipment and Lighting
  5. Building Your Portfolio
    • Working with Models and Clients
    • Types of Portrait Photography
  6. Pricing and Packages
    • Determining Your Rates
    • Offering Packages and Services
  7. Marketing and Branding
    • Building an Online Presence
    • Networking and Collaborations
  8. Managing Your Business
    • Client Communication
    • Scheduling and Time Management
  9. Conclusion
    • Achieving Success in Portrait Photography

Understanding Portrait Photography

What is Portrait Photography?

Portrait photography is a genre that focuses on capturing the essence and personality of individuals or groups. It goes beyond merely taking pictures and aims to tell a story through the subjects’ expressions, emotions, and interactions.

A lot of people give more importance to gear, lights and location. Yes, they are important and they separate ameteurs from professionals. But, remember, A portrait is a window to the soul. If you fail to capture the emotions, your photos are garbage no matter how sharp they are or how beautifully they are composed.

The Importance of Portrait Photography

Portraits hold sentimental value for people, making them an integral part of life’s milestones. From family portraits to professional headshots, this form of photography is in high demand and offers numerous opportunities for photographers.

Getting Started: Your Photography Skills

Mastering Your Camera

Before diving into a portrait photography business, you must have a strong command of your camera and its settings. Understanding aperture, shutter speed, ISO, and other essential functions is critical to capturing high-quality portraits.

A decent portrait lens of 1.8 or 2.8 aperture is also important. I am not a big fan of gear acquisition but if your client pay you to do a shoot, he/she is expecting a certain quality standard. It doesn’t have to be most expensive. A simple 50mm 1.8 will do the job in begining.

Developing Your Eye for Composition

Composition plays a pivotal role in portrait photography. Learn about the rule of thirds, framing, and leading lines to create visually appealing and engaging portraits.

Leading lines ( as shown above ), blurred foreground elements and simple backgrounds works almost all the time with portraits.

Communicating with the model and making them feel relaxed is also of utmost importance. Do talk to them for atleast 15 minutes before shoot so that they are comfortable with you. Take few test shots and show them your compositions. A compliment here and there will make them feel good and confident.

Business Essentials

Legal Requirements and Permits

Starting a photography business often involves legal obligations. Ensure you understand the necessary permits, licenses, and tax requirements in your area to operate legally.

keep consent form all the time with you. Whenever you do any photoshoot, make sure to get it signed by the model so that later their should not be any legal problems. I am providing one sample here. Feel free to modify it as per your conditions / needs. Also make sure to ask for permission from property owner if you are at private property.

Creating a Business Plan

A well-thought-out business plan is your roadmap to success. Define your niche, target audience, and marketing strategies in your plan. It will help you stay organized and focused on your goals.

To start out with, check the pricing plan of professionals. If you are good at photograpy then you can charge a low price on condition that you will use couple of their photos (with client’s consent and selection) on your social media.

use social media ads to increase your visibilty. If you have a good portfolio, people will definitely going to book you.

Setting Up Your Studio

Location and Space

Decide whether you want to operate from a dedicated studio space or work on location. The choice depends on your budget and the type of portraits you intend to offer.

I am not a big fan of artificial lights or studio backgrounds. I usually do destination weddings or vacation photo shoots. I know few locations around the city that are good for these types of shoots. It also reduces my budget for lights, rent and other equipment and increase my profit margin.

If you are a fan of indoor shoots, start with your basement and invest in few speed lights. Once you get a good grip then rent a small space for your studio.

Equipment and Lighting

Having the right tools is essential for delivering professional results. You don’t have to invest a lot in begining. Just start with a couple of speed lights and a neutral gray background. Why gray? You can change its color later on in post easily to any color.

Once you get the hang of it, you can start experiment / invest in reflectors , light doms etc.

Building Your Portfolio

Working with Models and Clients

Collaborate with models and clients to build your portfolio. Practice different styles and techniques to showcase your versatility as a portrait photographer. If you are a beginner, you can always use your friends and family as a model. You can offer them a free photoshoot in return of their consent to use their photos on your profile.

Types of Portrait Photography

Explore various types of portrait photography, such as family, corporate, and fashion portraits. Diversifying your portfolio can attract a broader clientele. Your portfolio should be versatile.

You can also make separate portfolios for separate types. I have separate portfolios for vacation photography, corporate headshots and weddings/engagements.

Pricing and Packages

Determining Your Rates

Set competitive and profitable rates based on your skill level, equipment, and market demand. Research local competitors to find your pricing sweet spot.

Compare yourself with other professionals and charge accordingly. Once you have a clientale, then you have all the freedom to charge according to your potential.

Offering Packages and Services

Create packages that cater to different client needs. Offer a range of services, from basic sessions to premium packages with additional features. Check out my packages for a vaction photography shoots here.

You can create a complete package that includes printing albums, creating social media collages and more. It will also increase your profit margin and client will be more comfortable.

You can even use your friends as makeup artist or wardrobe designer if they are good at it. But make sure your end result is professional and up to the mark.

Marketing and Branding

Building an Online Presence

Establish a strong online presence through a professional website and active social media profiles. Share your portfolio and engage with potential clients.

Facebook and instagram ads work wonders as they are very targeted. Build a professional website. There are tons of online building tools available. Build a good online presence. Its your first impression to clients.

Networking and Collaborations

Network with fellow photographers, models, and businesses in your community. Collaborations can lead to referrals and opportunities for growth.

There are groups and forums for that. Do join your local facebook groups for networking. Try to collaborate with your fellow photographers and ask them to give you credit or back link so that people can approach you too.

Managing Your Business

Client Communication

Effective communication is key to building trust and lasting client relationships. Respond promptly to inquiries and keep clients informed throughout the process.

Try to keep everything in black and white though emails. Don’t reply on whatsapp and voice notes. they are good but contractual conditions should be in writing to protect you from any future conflict.

Scheduling and Time Management

Create a reliable scheduling system to manage appointments and ensure you have enough time for each session. I used google calendar and Notion app for this. Punctuality is vital in the photography business. Reaching late for a meeting will destroy your chances of getting hired.

Deliver what you offer. Infact, try to deliver a little more than what you offer. If I had a shoot that includes 30 photos, I sometimes give them 2,3 photos more for free. Just to establish a good relationshoip.

Conclusion

Starting a portrait photography business requires a blend of creativity, technical skill, and business acumen. By mastering your photography skills, understanding the business essentials, and consistently delivering high-quality work, you can turn your passion into a successful career.

Do share your experiences / challenges below in comments. Lets make this blog post a good starting point for people who want to start Portrait photography business. Lets help each other 🙂

Mastering Bokeh Photography: A Guide to Captivating Background Blur

Introduction

Japanese bokeh, meaning “blur” or “haze,” is a famous photographic technique that lends charm to photos. It involves blurring the background while keeping the topic in great focus to isolate your subject and create depth to your photos. This guide will help you master bokeh photography and create stunning photographs.

Understanding Bokeh

Bokeh is characterized by the aesthetic quality of the blur in out-of-focus areas of an image. It is often achieved by using a wide aperture, which results in a shallow depth of field. The background and foreground elements become soft and creamy, while the subject remains sharply defined, creating a pleasing contrast that draws the viewer’s attention to the main subject.

Equipment You’ll Need (minimal)

Camera with Manual or Semi automatic Mode: A camera with manual mode gives you full power over the aperture settings. You can change the aperture, shutter speed, and ISO separately.

Lens with Wide Aperture: The key to achieving bokeh is a lens with a wide maximum aperture, typically f/2.8 or wider (smaller f-number). Prime lenses like a 50mm f/1.8 are excellent choices for bokeh photography.

Setting Up Your Camera

Select Aperture Priority or Manual Mode: Switch your camera to Aperture Priority (A or Av) or Manual (M) mode. These modes give you control over the aperture setting.

Choose a Wide Aperture: Select a low f-number (e.g., f/1.8 or f/2.8) to achieve a shallow depth of field. The wider the aperture, the more pronounced the bokeh effect will be.

Set ISO: Try to keep the ISO as low as possible. If shutter speed goes too low, you can raise it up to 400 or 800 max.

Focus on the Subject: Prices focus is very important. Since, depth of field is very thin in wide apertures, make sure focus is spot on.

Composing Your Shot

Distance and Perspective: Position your subject at a reasonable distance from the background to create depth in your composition. The farther the background elements, the more pronounced the bokeh will appear.

Background Selection: Choose a background with visually appealing elements, such as lights, foliage, or patterns. These elements will be transformed into beautiful bokeh balls or shapes. The further the background, better bokeh

Frame Your Subject: Frame the subject in a way that background blur should be simpler and not too complex. Choose the background that has some contrast. That way bokeh balls are more visible.

Shooting Techniques

Use a Wide Aperture: This is the key to achieving bokeh. The wider the aperture (smaller number), the better bokeh. Set your laperture to f/1.8 or f/2.8 if possible

Get Closer to Your Subject: Physically move closer to your subject while maintaining focus. This helps to isolate the subject and enhance the bokeh effect.

Zoom In: If you’re using a zoom lens, zoom in on your subject. A longer focal length will compress the background, making it easier to achieve bokeh.

Maintain Adequate Distance: Ensure there is sufficient distance between your subject and the background. The farther the background, the creamier the bokeh will be.

Focus Point: Pay close attention to your focus point. Aim to focus precisely on the subject’s eyes or the point of interest.

Lighting Considerations

Golden Hour: Shooting during the golden hour (shortly after sunrise or before sunset) provides soft, warm light that enhances the bokeh effect. Warm light usually gels well with bokeh. Also day light looks more natural.

Backlighting: Position your subject with backlighting, such as the sun behind them, to create a dreamy and ethereal bokeh background. This automatically enhances the overall glow of a photograph. It specially goes well with portraits.

Post-Processing

After capturing your bokeh shots, you can enhance the effect further during post-processing. Software like Adobe Photoshop or Lightroom allows you to fine-tune the bokeh, adjust contrast, and enhance colors to make your images truly pop.

Experiment and Practice

Mastering bokeh photography takes practice. Experiment with different lenses, apertures, and compositions to discover your unique style. Don’t be afraid to make mistakes and learn from them. As you gain experience, you’ll develop an instinct for when and how to use bokeh to create captivating images that leave a lasting impression.

A comprehensive guide to Travel Photography Jobs

Are you a photographer who has always wanted to convert your hobby into a career? Imagine jet-setting to gorgeous destinations, capturing the world’s beauty through your lens, and getting compensated for it. Welcome to the fascinating world of travel photography jobs, where your passion can become your paycheck. This is a comprehensive guide. So, sit tight and embark on your journey towards landing that dream position!

Table of Contents

  1. Introduction
    • Explanation of the growing interest in travel photography jobs.
    • The appeal of turning a hobby into a profession.
  2. Understanding the Basics
    • The essential skills and equipment needed for travel photography.
    • How to develop your photography skills as a hobbyist.
  3. Building a Stunning Portfolio
    • The importance of a diverse and impressive portfolio.
    • Tips for creating a portfolio that stands out to potential employers.
  4. Networking and Branding
    • Leveraging social media and online platforms.
    • Connecting with fellow photographers and potential clients.
  5. Seeking Job Opportunities
    • Different types of travel photography jobs available.
  6. Preparing for Interviews
    • Crafting a compelling resume and cover letter.
    • Nailing the interview and showcasing your passion.
  7. On-the-Job Challenges
    • Common challenges faced by travel photographers.
    • Strategies for overcoming obstacles in the field.
  8. Maintaining a Work-Life Balance
    • Balancing work and personal life as a travel photographer.
    • Avoiding burnout and staying inspired.
  9. Earning Potential
    • Exploring the financial aspects of travel photography.
    • Realistic expectations for income as a travel photographer.
  10. Conclusion
    • Summarizing the key takeaways.
    • Encouragement and inspiration for aspiring travel photographers.

Introduction

In the past few years, there has been a rise in the number of people who want to work as trip photographers. With the rise of social media and the constant need for high-quality visual material, there has never been a better time for amateur photographers to turn their skills into a career. In this complete guide, we’ll show you how to go from taking pictures as a hobby to getting paid to do it in the competitive field of trip photography.

Understanding the Basics

Essential Skills and Equipment

It’s important to have a firm grasp of the fundamentals before setting out on a career in travel photography. Learn the fundamentals of photography and master composition, lighting, and editing. Get professional-grade equipment like DSLRs or mirrorless cameras and train yourself to operate them properly.

Developing Your Skills as a Hobbyist

As a hobbyist, you have the advantage of time and experimentation. Practice, practice, practice! Experiment with different photography genres and styles to find your niche. Attend workshops, watch tutorials, and read photography books to continually improve your skills. There is endless supplyof very detailed tutorials on internet.

Building a Stunning Portfolio

The Importance of a Diverse Portfolio

Your portfolio is your calling card in the world of travel photography. It should showcase your versatility and creativity. Include a wide range of photographs, from landscapes and portraits to street photography and wildlife shots. Potential employers want to see your ability to adapt to various scenarios. Outdoor portraits is one such genre that is getting popularity these days.

Tips for Creating an Impressive Portfolio

Learn the art of storytelling through your photographs. Curate your portfolio with a strong narrative, taking viewers on a visual journey. Use photo editing software to enhance your images while preserving their authenticity. Your portfolio should reflect your unique perspective and style.

There are lot of websites that can create your online portfolio that you can easi;ly share with your potential client online.

Networking and Branding

Leveraging Social Media and Online Platforms

Now is the time where social media is the most powerful tool for photographers. Back in days, photographers used to do physical netwokring. But social media now breaks that limit and make it utmost for photographers easy to create a brand in minimum amount of effort. You can create accounts on instagram, facebook and 500px. Respond to user queries and comments and see which images were liked by majority.

Connecting with Fellow Photographers and Clients

Networking is key to landing travel photography jobs. Attend photography meetups, workshops, and conferences to meet fellow photographers and potential clients. Collaborate with other creatives to expand your reach and gain valuable experience.

Seeking Job Opportunities

Types of Travel Photography Jobs

Travel photography offers a diverse range of job opportunities. You can create a travel blog that guides potential travllers about the area you are acustomed to. You can work as a photography tour guide. A lot of people want a photographer to give them a tour, so that you show the places that are most photogenic. There are online services such as localgraphercom, flytographer.com and locallens.com that offers photoshoot assignents to local photographers. I too have my profile up and running on some of these websites and I am getting decent amount of jobs from them.

Preparing for Interviews

Crafting a Compelling Resume and Cover Letter

Your portfolio should highlight your photography skills, experiences, and passion for travel. Showcase your portfolio and any relevant certifications or awards. Tailor your application materials to each job you apply for.

Nailing the Interview and Showcasing Your Passion

During interviews, be prepared to discuss your portfolio and photography philosophy. Demonstrate your enthusiasm for travel and your ability to adapt to different environments. Your passion and personality can be just as important as your technical skills.

On-the-Job Challenges

Common Challenges Faced by Travel Photographers

Working as a travel photographer isn’t always a walk in the park. You may encounter unpredictable weather, difficult lighting conditions, or cultural challenges. Learn to adapt and problem-solve on the go.

Strategies for Overcoming Obstacles

Equip yourself with the right gear and knowledge to handle challenging situations. Build resilience and flexibility, and always have a backup plan. Remember, some of the best shots come from unexpected moments. Make sure your expensive gear should not be highlighted too much or you will be in limelight for people looking for a quick job 🙂

Maintaining a Work-Life Balance

Balancing Work and Personal Life

Travel photography can be demanding, often requiring long hours and time away from home. It’s essential to find a balance that works for you and your loved ones. Prioritize self-care and downtime to avoid burnout.

Avoiding Burnout and Staying Inspired

Maintaining your creativity and passion is crucial in this field. Take breaks, explore new destinations for personal projects, and seek inspiration from fellow photographers and artists.

Earning Potential

Exploring the Financial Aspects

While travel photography can be incredibly rewarding, it’s essential to have realistic expectations about income. Income can vary significantly based on your niche, experience, and the clients you work with.

Realistic Expectations

Initially, you may need to supplement your income with other photography-related work or part-time jobs. As you gain experience and recognition, your earning potential can increase.

Conclusion

In the world of travel photography jobs, the journey from hobbyist to hired is an exciting adventure filled with learning, growth, and unforgettable experiences. As you build your skills, network with fellow photographers, and pursue your passion, you’ll discover that turning your love for photography into a career is both challenging and immensely rewarding.

We hope this guide has provided you with valuable insights and practical tips for embarking on your travel photography journey. Remember, every great photographer started as a hobbyist with a dream. Now, it’s your turn to capture the world and make your mark in the world of travel photography.

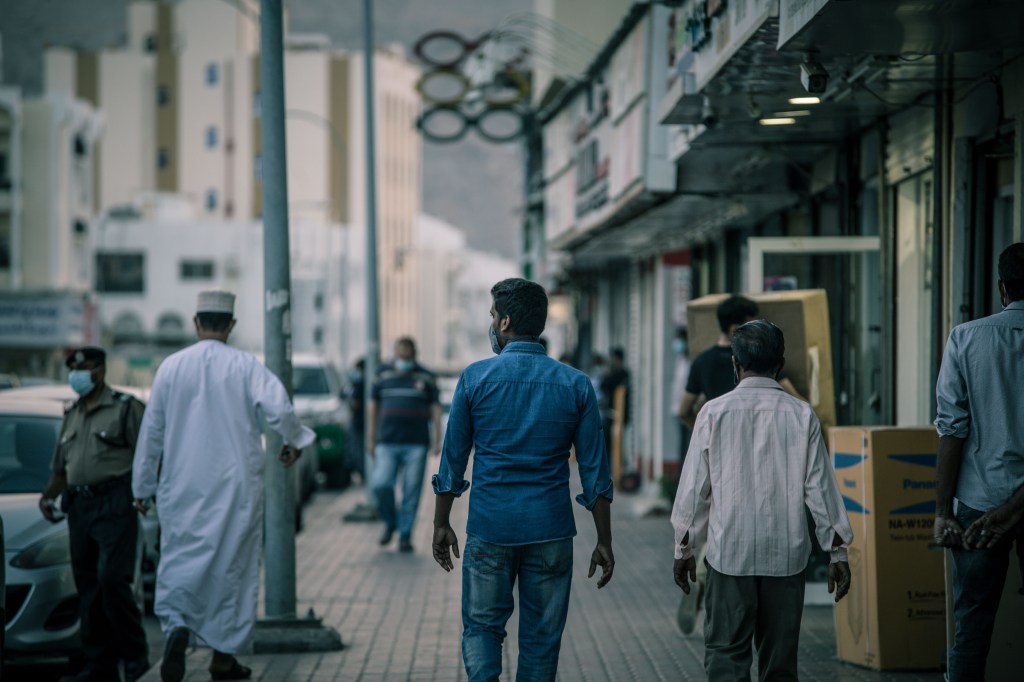
The Human Connection: What Makes Street Photography So Compelling

Introduction

Street photography is something really special. It has a charm that pulls in both photographers and people who look at the pictures. It’s a kind of photography that captures the true essence of what it means to be human. In this article, we’ll explore what makes street photography so interesting. We’ll talk about how it shows us ordinary life, tells stories, and connects with strangers.

A Glimpse into Ordinary Lives

Capturing everyday moments

Street photography is not about staged scenes or elaborate setups. It’s about seizing the unscripted moments that unfold on the streets. Photographers become invisible observers, documenting the beauty of everyday life. It’s in these ordinary moments that the extraordinary is often found.

Candid shots vs. posed portraits

What sets street photography apart is the spontaneity of the shots. Unlike traditional portraiture where subjects are aware of the camera, street photographers capture people in their most genuine states. This authenticity forms a deep connection between the viewer and the subject.

Storytelling Through Images

The power of visual narratives

Street photography is a silent storyteller. Each frame tells a unique story or raises questions. Viewers are invited to interpret the narrative, allowing for a rich and personal experience. The absence of words lets the images speak for themselves.

Evoking emotions through photography

Emotion is the heart of street photography. A well-composed shot can evoke a range of feelings, from joy and nostalgia to empathy and introspection. These emotional connections are what make street photography so compelling.

The Art of Observation

Developing a keen eye

Street photographers possess a unique ability to spot beauty in the mundane. They train their eyes to see potential shots in the chaos of the streets. This heightened observation skill adds depth and intrigue to their work.

Patience as a virtue in street photography

Great street photographs often require patience. Waiting for the perfect moment or the right subject can be challenging, but the reward is a shot that captures the essence of a fleeting moment in time.

Connection with Strangers

Breaking the barrier

Approaching strangers for candid shots can be intimidating. Successful street photographers learn the art of breaking down barriers, building trust, and maintaining respect for their subjects. Establishing a connection, even if brief, is essential.

Ethics and consent in street photography

The line between capturing a genuine moment and invading someone’s privacy can be thin. Ethical street photographers prioritize obtaining consent when possible and respecting the boundaries of their subjects.

The Role of Timing and Composition

Finding the right moment

Street photographers often say that timing is everything. Knowing when to click the shutter is an art in itself. It’s about anticipating actions and reactions, ensuring that the photograph encapsulates the essence of the scene.

Composing striking street photographs

Composition plays a significant role in street photography. Framing, leading lines, and use of negative space are all critical components. A well-composed shot can turn an ordinary scene into a masterpiece.

The Influence of Technology

Advancements in street photography

Technology has transformed street photography. With the advent of smartphones and mirrorless cameras, more people can participate in this art form. However, the essence of street photography remains the same: capturing humanity.

Staying true to the essence of the art

While technology offers convenience, it’s essential for street photographers to stay true to the core principles of their craft. It’s not about the gear; it’s about the human connection and the stories within the frame.

Cultural and Societal Reflections

Street photography as a mirror of society

Street photographers often document cultural and societal changes. Their work reflects the spirit of the times, highlighting issues, diversity, and social dynamics. It becomes a historical document of our ever-evolving world.

Documenting social change and diversity

Street photographers have the power to shed light on underrepresented communities and issues. Their work can spark conversations and inspire change, making street photography a powerful tool for social awareness.

Challenges and Rewards

Overcoming obstacles in street photography

Street photography presents its fair share of challenges, from the unpredictability of the streets to legal and ethical considerations. However, the pursuit of that one perfect shot keeps photographers motivated.

The satisfaction of capturing the perfect shot

The reward of street photography is the satisfaction of freezing a moment in time, capturing a genuine human connection, and sharing it with the world. It’s a pursuit that feeds the soul of both the photographer and the viewer.

Conclusion

In conclusion, street photography’s enduring appeal lies in its ability to connect us with the world, to make us pause and ponder the intricacies of life. It’s an art form that captures the raw, unfiltered beauty of humanity. Aspiring photographers and viewers alike are encouraged to explore the streets, camera in hand, and discover the captivating world of street photography.

What do you guys think about street Photography? Do mention your expeirences and considerations in comments. Lets roll a healthy discussion below… 🙂

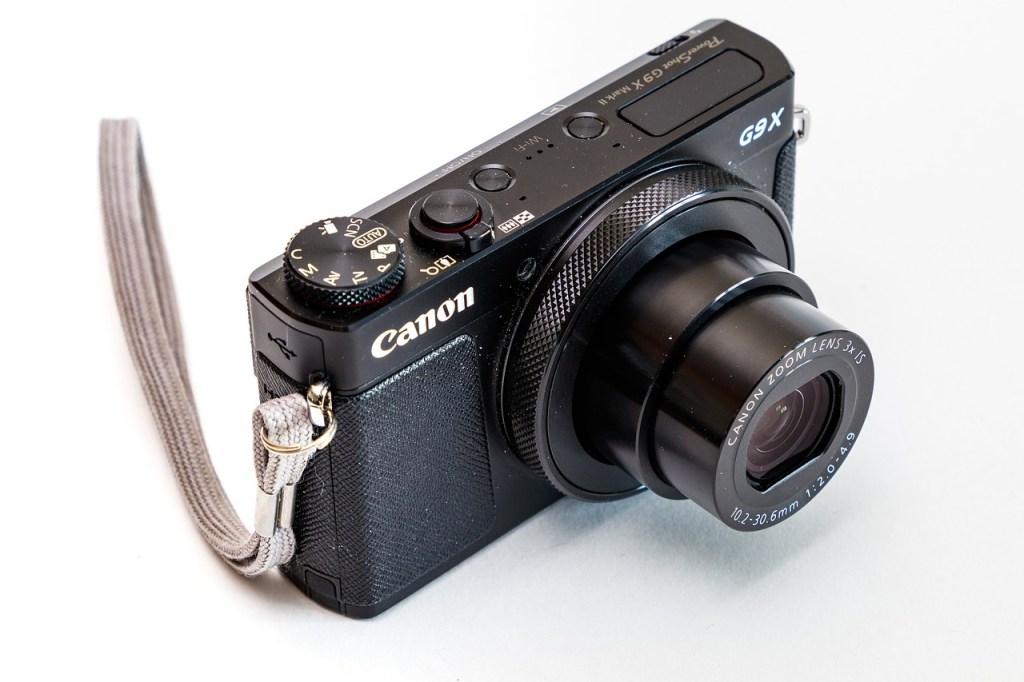
Should You Buy the Canon G7 X Mark II in 2023?

Introduction

In the ever-evolving world of digital photography, having a reliable and feature-packed camera is essential to capture those precious moments. The Canon G7 X Mark II has been a popular choice among photographers and vloggers for its impressive capabilities. However, with technological advancements, it’s natural to wonder if the G7 X Mark II is still a worthy investment in 2023. In this article, we will delve into the features, advantages, limitations, lots of sample images ( at the end) and user reviews of the Canon G7 X Mark II to help you make an informed decision.

Overview of the Canon G7 X Mark II

The Canon G7 X Mark II is a high-end compact digital camera that packs a punch in a small form factor. It features a 1.0-inch, 20.1 megapixel CMOS sensor and a powerful DIGIC 7 image processor, enabling it to deliver stunning image quality. Additionally, the camera offers a versatile 4.2x optical zoom lens with a focal range equivalent to 24-100mm in 35mm format, making it ideal for various shooting scenarios.

Advantages of the Canon G7 X Mark II

High-Quality Image and Video Output

One of the standout features of the Canon G7 X Mark II is its ability to produce high-quality images and videos. The large sensor and powerful processor work together to capture sharp, detailed, and vibrant visuals even in challenging lighting conditions. Whether you’re capturing landscapes, portraits, or fast-moving subjects, the G7 X Mark II delivers impressive results.

Compact and Portable Design

The G7 X Mark II’s compact and lightweight design makes it a perfect companion for travel and everyday shooting. Its pocketable size allows you to slip it into your bag or pocket effortlessly, ensuring that you never miss a photo opportunity. Despite its small size, the camera is ergonomically designed, providing a comfortable grip for extended shooting sessions.

User-Friendly Interface

Canon has designed the G7 X Mark II with an intuitive user interface, making it accessible to both beginners and experienced photographers. The camera’s touchscreen display allows for easy menu navigation and quick adjustments to settings. Additionally, the inclusion of physical control dials gives users more control over their shooting experience.

Limitations of the Canon G7 X Mark II

Limited Zoom Range

While the G7 X Mark II’s 4.2x optical zoom is adequate for most situations, some users might find it limiting, especially when compared to other cameras on the market. If you frequently shoot subjects at a distance, you might want to consider a camera with a more extensive zoom range.

No External Mic Input

Vloggers and content creators who rely heavily on audio quality may find the absence of an external microphone input disappointing. While the camera’s built-in microphone performs reasonably well, an external mic can significantly improve audio clarity and reduce background noise.

Comparison with Other Cameras in 2023

In 2023, the camera market is flooded with options, and it’s essential to consider how the Canon G7 X Mark II stacks up against its competitors.

Canon G7 X Mark III

The Canon G7 X Mark III is the successor to the Mark II and comes with some notable upgrades. It features a live streaming function, vertical video support, and a higher-resolution LCD screen. However, the Mark II still holds its ground in terms of image quality and overall performance.

Sony RX100 VII

Sony’s RX100 VII is another strong contender in the premium compact camera segment. It boasts a more extended zoom range, a superior autofocus system, and impressive video capabilities. However, the RX100 VII also comes with a higher price tag compared to the Canon G7 X Mark II.

User Reviews and Testimonials

Before making any purchase, it’s crucial to hear from users who have hands-on experience with the product. The Canon G7 X Mark II has garnered positive reviews for its image quality, portability, and ease of use. Users have praised its performance in various shooting conditions, making it a reliable choice for both amateurs and professionals.

However, there have been some complaints about the limited zoom range and occasional overheating during prolonged video recording sessions. It’s essential to weigh these reviews against your specific needs and shooting preferences.

Price and Value for Money

The price of the Canon G7 X Mark II may vary depending on the retailer and any ongoing promotions. While it might not be the newest model on the market, it still provides excellent value for money, especially for photographers who prioritize portability without compromising image quality.

Sample Images

Who Should Buy the Canon G7 X Mark II in 2023?

The Canon G7 X Mark II remains an excellent choice for:

Travel photographers who need a compact and versatile camera for their adventures.

Vloggers and content creators who prioritize video quality and want a camera that can be easily carried around.

Enthusiasts and professionals who want a secondary camera for specific shooting situations.

Tips for Making the Most of the Canon G7 X Mark II

Mastering Manual Settings

Although the G7 X Mark II offers fantastic automatic shooting modes, taking control of manual settings allows you to unleash its full potential. Experiment with aperture, shutter speed, and ISO to achieve creative and personalized results.

Utilizing Creative Shooting Modes

The camera comes with various creative filters and shooting modes that can add a unique touch to your photographs. Explore features like the Panorama mode, Time-lapse, and HDR to capture stunning images in different styles.

Frequently Asked Questions

Q: Can the Canon G7 X Mark II shoot in RAW format?

A: Yes, the G7 X Mark II supports RAW image capture, providing more flexibility in post-processing.

Q: Does the camera have built-in Wi-Fi for easy sharing?

A: Yes, the G7 X Mark II has built-in Wi-Fi and NFC, making it convenient to transfer images wirelessly to your devices.

Q: How does the camera perform in low-light conditions?

A: The G7 X Mark II performs admirably in low light, thanks to its large sensor and advanced image processing capabilities.

Q: What is the battery life of the Canon G7 X Mark II?

A: The battery life is decent, allowing for approximately 265 shots on a single charge.

Q: Is the Canon G7 X Mark II suitable for vlogging?

A: Yes, the G7 X Mark II is a popular choice for vlogging due to its compact size and excellent video quality.

Conclusion

In conclusion, the Canon G7 X Mark II remains a compelling option for photographers and vloggers in 2023. Its blend of excellent image quality, portability, and user-friendly interface make it a versatile tool for capturing memories and creating engaging content. While newer models may offer some advancements, the G7 X Mark II still holds its ground as a reliable and capable camera. Whether you’re an aspiring photographer or a seasoned professional, this camera could be a valuable addition to your gear collection.

Found something useful?

If you find any of the information on this website useful, please do consider donation. It will help me in keeping this up and running. Thanks

$5.00

Click here to purchase.

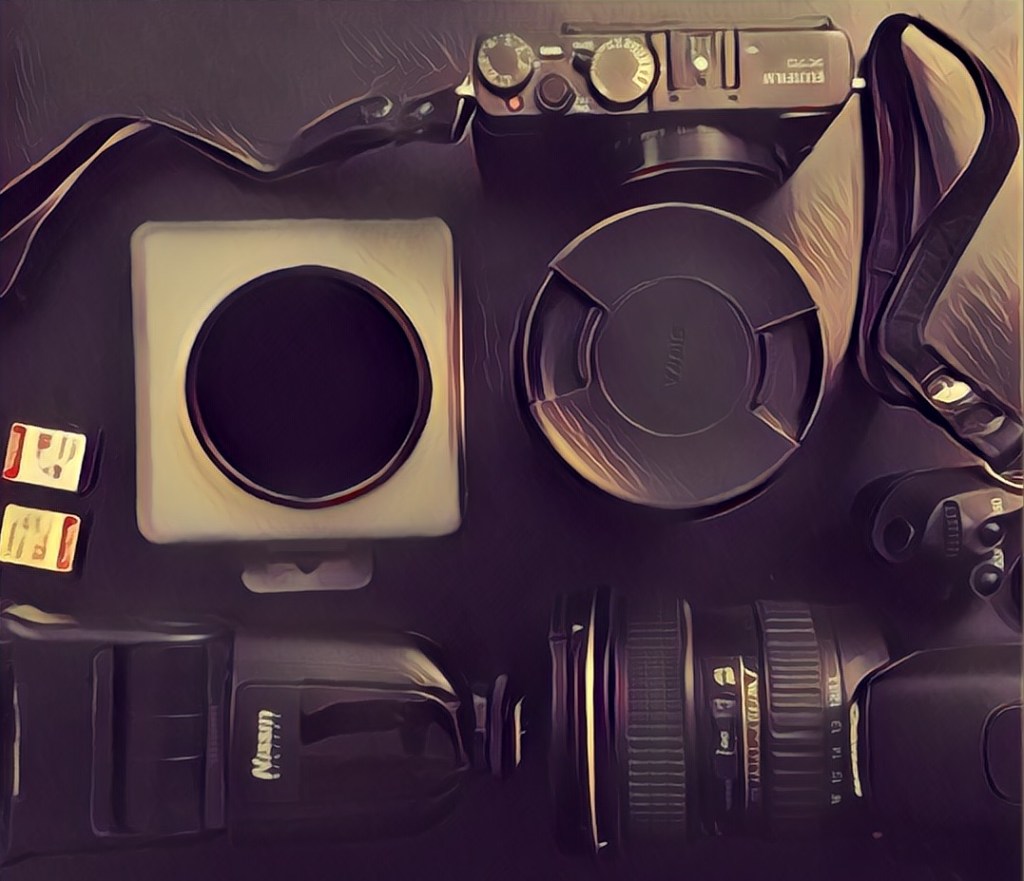
Three easy steps of taking a good picture

Most of you, off and on takes a good picture. Whether you are a seasoned PRO or an amateur photographer, you all are proud of some of your work. But the problem is the frequency of which you are producing good quality work.

How many times you faced a situation when after a shoot you check your images,but they are not up to the standard. Do you wonder how PRO photographers produce good quality work on a consistent bases?

If you are intrigue by this questions then this article is for you. The answer to the above dilemma is the Photography workflow. Every PRO photographer has a specific workflow when it comes to taking a picture. Sticking to a specific workflow that gives you good results will increase your consistency of getting good results.

Every photographer has their own workflow

I mostly shoot outdoor/lifestyle and travel/street photography. I devised a very simple workflow that works for me in above mentioned style. You can start with it and tweak it as per your style. It has three steps. Let’s start with it.

1. Identify what caught your attention.

This is probably the foundation of taking a good picture. The definition of an interesting subject is completely subjective. Something might be interesting to you but completely mundane for others.

Before even you lift your camera to your eye, ask yourself what exactly caught your attention. This question is of primary importance as based on that you will continue with the next two steps i.e. lighting and composition.

It could be anything. It could be an interesting outfit someone is wearing on street. It could a beautiful formation of clouds or even some nice pattern or repetition of something. Identifying it initially lets you enhance its impact using other two steps i.e. lighting and composition.

In above two pictures, two things actually caught my attention. The crack on the road and bright red wheel caps of a car. Identifying my subject at very early stage lets me compose my image in a way that enhances and highlighted my subject matter much clearly.

2. Study the Light

It is believed that a photograph is as good as the quality of light. So, studying the lighting condition is very important. Once you identify the subject matter, it’s time to look out for ways to enhance that subject.

Let’s say that you want to take a portrait of a person. Now, most flattering light for a portrait is soft light. You need to think how you can photograph that person in a soft light. If it is possible to move that person to a shade, then do it. If it is not possible than try to change your angle to see if it can be improved.

Simply put, analyze the current light in which your subject is. And look for ways if something can be done to improve it. Sometimes the subject is so interesting that even in bad light it is worth taking a picture but in most cases if you do a little bit of effort, you will greatly improve the quality of your picture.

I took this picture in a GYM/training center. The light is quite dim and only certain areas are properly lit. Since I analysed the lighting conditions earlier, I was waiting for these fighters to come in that specific spot so that they will lit properly.
I took this portrait of a shop keeper in northern Pakistan. I asked him whether he can come towards the shop window so that I can have enough light for a picture. He agreed and I took this picture. Otherwise this portrait will not have that much details and impact .

3. Take your time to Compose

After selecting a proper subject and working on light, it’s time to actually compose your picture. Now this is the step where you can be very creative. This step will let you stand out from other people. Lot of photographers when they photograph certain touristic place or situation, they follow the cliche. Spending a little bit of time on your composition will greatly improve your shot.

You can start off with some basic and cliche shots. That will give you initial confidence. Then make your way to more challenging and creative compositions. Now there are lot of aesthetic composition rules that can be applied to enhance your subject. Few of them are as follows.

1. Try to include something related to your subject either in foreground or background. That will emphasize the overall theme. Environmental portrait photographers do this all the time.
2. Use leading lines to direct viewers towards your subject.
3. If surrounding doesn’t support the subject, either use simpler backgrounds or try to blur it as much as possible.
4. Use dodging and burning in post to enhance your subject. Not exactly a composition rule but it does make a difference.

In this picture the beautiful sunrise caught my attention. So in order to direct viewer towards a sunset, I put a foreground subject i.e. my friend and let her look towards sun. That way viewer is drawn towards the sun even though the sun is out of focus but still it gets more attention.
Here I draw the attention towards my model by using leading lines. All diagonal lines and arches are converging on my subject.

Conclusion

If there is one important thing that I learned over time, it is this. Never hurry when taking a picture. This one practice will immensely improve your picture. Just by delaying shutter click will start improving your pictures.

Make this workflow your day to day practice. It’s not necessary to follow it as it is. You can change it according to your style. But make it quick and simple. That way it will be more practical and can be followed easily.

Try these 7 Essential Travel Photography tips

Introduction

Everyone loves vacation. Usually when we travel, no matter how far and wide, new or beaten path, we all love to document our experiences.

Sometimes it’s our our simple vacation to some nearest locations for a change. Or sometimes we do travel to get some inspiration for our photography.

Travel photography is by far the most loved genre of photography. Here are few tips that will surely help you maximize your productivity while doing travel photography.

1. Pick the right gear.

Selecting proper gear is of prime importance in my opinion. It somewhat depends upon the purpose of vacation. Very few people actually travel only for photography. Majority of people just want to clear their minds. They want to enjoy and have a good time. And in the process they want some good photographs.

The key is to travel as light as possible. For me its just one camera body with one walk around lens. I try not to pack a complete camera bag with 2,3 lenses, laptop and accessories etc.

I always take my canon 6D with sigma 24-70 f2.8 lens. Yes I do miss 20mm focal length for landscapes and 135mm for street portraits. But keeping just one camera-lens setup forces me to look for creative alternatives.

Check out my article on Contrastly : How a single camera and lens can improve your photography. In this article Inexplained how I used Fuji x70 during my entire vacation. It has a fixed focal length of 28mm. If you are into street photography Fuji x70 will be your perfect partner. Check my review of fujix70.

2. Document your own Journey too.

It’s very easy to dive too deep into photography while You are on your vacations. Remember, vacations are meant to enjoyable and if you are too serious about your photographs, you will end up feeling exhausted by the end.

Document your entire journey along the way. Take photographs of your car, hotel room, restaurants where you dine and any tour guide or local food. Capture all the crazy and silly moments. Its these photos that you will cherish after 10 years.

While documenting all these things, you might get a lot of good professional photographs as well. I always try to take proper portraits of people I am interacting while I am on journey. I met one old guy (shop keeper) once on my vacation. I took his portrait and that picture ended up as full page feature on Digital Photo Magazine.

My Travel Photo as a full page feature in DP Mag

3. Hire a Local Photographer as guide.

Not all of us can afford a tour guide, yet alone a photographer guide. But if you are serious about photography or you are on some project, hiring a local photographer will go along way.

Local photographers knows all about the place. they know which time and location is best for which type of photograph. They know where permissions are required and where you can simply sneak and take your shots quickly.

You can search local photographers on instagram. Contact them using DM and describe what you want exactly. Once agreed on a price, you are good to go. I used that concept and now I started my own business based on this.

If you are coming to Muscat,Oman, feel free to contact me ( im.zahid@hotmail.com ) for any photography tour, Photography workshop or on-location vacation shoots.

4. Make the Most out of your time.

Unless you are on a specific project, don’t be too eager. Divide your day time into chunks of time for photography and leisure. Golden and blue hours are definitely important and should be taken seriously for good landscape and outdoor portrait shots.

But after sun is high enough or after dark, still you can do a lot. Harsh light might be bad for landscapes but it is very good for street photography. You can make use of strong light and shadows during this time while walking inside markets and pathways. Night time is good for documenting night life of a city. Even same place looks enitrely different during daylight and night time.

So use your time wisely. Also use bad light for your leisure as much as possible. I usually take a sandwich or some snacks during actual shoot and go to restaurants, movies,shopping and meeting friends during bad light. That way I utilize my time more efficiently and balance my photography/leisure time.

Light and shadows

5. Do your Homework.

It doesn’t matter whether you hire a local guide, photographer or you have a friend. Always do your homework before going to vacation. Always search for worthy locations and local activities. It will help you in making a blue print of what kind of photographs you might end Up when your vacation finishes.

When you are hiring a guide or photographer, always contact them and discuss these in advance. Check with your fellow photographers or friends who have been there. Once your homework is done. It will be much easier for you to check if everything is going in a right direction or not.

6. Mingle with locals.

If you really want to make the most out of your vacation, try to communicate with locals. I know, when you are travelling to distant places, there is a language gap. But you will always find someone that can do it for you or someone that knows a little bit of English.

Communication with locals open new areas for you. You might get unexpected opportunities of photography. Your knowledge will widen as you start communicating with them. You will start to know their customs and traditions etc.

I always communicate with locals and try to capture the real essence of that area. For street and portrait photography, it is the best strategy.

7. Don’t Compromise on your Safety.

Not all countries and cities are completely safe. Even some of the safest countries have few cities that are not safe. So, if someone informs you about something, do take it seriously. If you end up losing your expensive gear or get injured, it will ruin your vacation.

Don’t try to look too overly classy. Hide your brand name on your gear. Keep your eyes open if you think something fishy is going around. Always check with locals about security situation if you are in a city that has a bad reputation.

Some places require permission from certain authorities before taking pictures. Check for these things from local guides or hotel staff first.

Conclusion.

The key to good travel photography is a combination of being at the right place at right time. Whether you are a PRO or an amateur photographer. Whether you have an expensive camera setup or a simple point and shoot. These travel photography tips will still be applicable to you.

And last but not the least. Travel photography is supposed to be fun. So keep it that way. Don’t stress out if you are not getting good shots. Just keep your cool and make use of your time based on my tips while enjoying your vacation.

Peace.

It’s time to break following 6 Cliches in your photography

Photography is an art form. And ART is subjective in nature. It is difficult to define what is cliche and what is not. But, there are certain types of photographs that are too common over the internet and normally they are considered as a cliche.

Cliches are called cliches for a reason. They all started as a normal thing. Normally they are very good ideas and that’s why they became so popular in the first place. But at some point their overuse by people make them a cliche.

With the ever growing market of cheap consumer level DSLRs and PRO phone cameras, Everybody is now a photographer. If you are somewhat serious about the art of photography, you need to stop doing following photography cliches and start bringing your own creative touch in your photography.

For dedicated Photography Workshop in Oman. See here
For dedicated Portrait and Lifestyle photo sessions in Oman. See here

1. Always using Black and White for Street Photography.

We all at some point or another, tried our hands at street photography. It looks artistic and classy. But why everyone is converting their street photographs to black and white?

Most of the famous street photographers had their work in black and white because they belong to black and white film era. At that time, either color cameras were not present or too expensive. So, their work is mostly in black and white. Most of the iconic street photographs are black and white.

Now that we have powerful DSLRs, there is no need to go for that look. Only go for black and white if it makes sense. Lets suppose, you want to get rid of uncontrolled distraction (different colors of cars and sign boards that don’t go with your color theme) or you want to emphasis on light and shadows.

The first image here is of a Porter on Karachi Railway station. Black and white won’t work here as people will not able to distinguish his specific Green,yellow and red uniform.

Porter on Karachi Railway Station

This second image is of a butcher in Muscat city. This whole image is pretty much teal in color and converting it to black and white will render an image with very less contrast.

Black and white is a creative choice. Don’t blindly use it because most famous street photographs are in black and white . Understand its PROs and CONs and do it creatively.

Butcher in Muscat

2. Punchy High Dynamic Range (HDR) images.

High dynamic range photography is a process where you capture multiple images. One for each shadows, highlights and mid tones. You blend them together to make an image with details in both dark and bright areas. It all started when camera sensors were not that strong as they are now a days.

Today’s consumer level DSLRs and even high end point and shoot cameras have very powerful RAW image processors. All you have to do is to adjust highlights and shadows along with blacks and whites and you are good to go. 

Processing single RAW file will give you much better and natural results than blending multiple images. Yes, HDR blending has its own place. It comes handy when there is too much contrast in a single image. But overall HDR images look unnatural and over processed.

Both of the images here are HDR images of a Mosque from a single RAW file. I only used shadows and highlights adjustments to bring details in specific sections. You can see the details in both bright and dark areas.

Grand Mosque Muscat
Grand Mosque Muscat

3. Sticking to rule of thirds at all time.

Almost everybody know the rule of thirds. It’s the first rule that you learn when you start learning composition in photography. Rule of thirds is very scientific in nature and 9 out of 10 times it gives you good results. And that makes it a Cliché.

There is a famous saying that ‘Rules are meant to be broken’. It’s true. Just by deviating away from some industry standard will automatically make you stand out among the crowd. But it has to be done with care. You can avoid the rule of thirds in symmetrical compositions very easily. You can avoid it in minimalistic shots as well.

With practice you will come to know when you will get better results by not following this rule. Whenever you shoot some picture, always experiment with different versions. Rule of thirds is a good starting point for your composition. But since everyone uses it all the time, it’s a bit boring.

Alternatively, you can place your subject in extreme sides or corners and still make an attractive composition by placing some elements on opposite side to balance it.

Both the sample images here doesn’t strictly follow rule of thirds but still they have an interesting balance and composition.

Royal Opera House Muscat
Jebel Akhdar Mountain

4. Following histogram religiously.

Histogram is very powerful tool that lets you decide whether you have a properly exposed picture or not. Understanding histogram is of prime importance. Just by looking at it, you can tell whether you have pure whites or pure blacks in your image, i.e. whether you lose details in highlights and shadows or not.

The problem is, histogram only tells you the range of the brightest and the darkest pixels in your image. It doesn’t know what you want to shoot actually. If you want to shoot low key or high key image, the histogram will show that you are clipping shadows or highlights. In this particular case, I want to shoot a low key silhouette image in Muttrah Souq, Oman. It is ok since I deliberately want to clip both shadows and highlights. It’s your creative decision.

High contrast image with histogram

Histogram is also good when you have an inconsistent LCD screen on your camera. Camera LCDs are normally much brighter than actual image is. Sometimes the image looks properly exposed on screen, but actually it’s a bit underexposed. You have to pull shadows in post later on to balance it and it will introduce some noise.

Checking histogram will tell you this at the time of the shoot. You can adjust your settings in camera, and you don’t have to push it in the post. You must know how to read a histogram. But you should also know when to follow it and when to follow your own creative guts.

5. Using Image Borders

Gone are the days when the only outcome of photography is the wall mounted frame. This age is the age of social media. Yes, wall hanging frames still have their own place. You can’t deny that. But making your image compatible over the internet is important.

People normally add borders because of two reasons. Either their frame corners are not tight enough and they need some sort of borders to keep it under boundary or their subject is not prominent enough.

Try framing your image in a way that it naturally creates a border around your subject. You don’t have to use frames within frame technique all the time. Just try to look around the edges of your frame and place something strategically to guide viewers’ eye.

Here I shot these three guys walking in Nizwa market in Oman in a way that it creates a natural frame around them. Although it only covers left and right side of image.

Nizwa market in Oman

Another technique is to use a vignette in your images either by using dodge and burn technique or simple darken your edges and brighten the subject. In this image, the sky is completely plain, so I added a little vignette to create a border.

Architecture build

6. Using cliché Lens choices.

It is common to shoot Landscapes with wide angle lens, Street photography with 50mm and portraits with an 85mm or 100mm lens. Thousands of images are uploaded over the internet on a daily basis that follows the same exact rule.

Every other shot that follows these clichés looks almost identical. Like the rule of thirds, these lenses will give you great results. The wide angle lens lets you include foreground and background both in focus. Telephoto creates simple background with flattering facial features. But try something different to create a new perspective.

Like I shot this landscape and architecture image with a 50mm lens. It’s a totally different perspective of this place as compared to all other pictures of the same place. You can try portraits with a wide angle and street photography using telephoto lens as well.

The Road
Grand Mosque

Conclusion

It doesn’t mean that you should not use these techniques at all. Using a bit of all of these techniques in moderation is all you need to avoid clichés.

It’s really hard to find the subject that has never been photographed before. Try to look subjects in a different way. Try different angles. Try different lenses and filters. Try different post processing techniques that are not common.

One interesting way is to start a project of photographing the same subject in 15 different ways. It will force you to look at the subject in an entirely different way. That practice will help you in your photography in general.

Again photography clichés are not bad. It’s just that they are way too common and they won’t help in bringing your very own personality in your photography. Now, try to be creative and tell me in the comments section which cliché you find most annoying.

Blog at WordPress.com.

Up ↑